

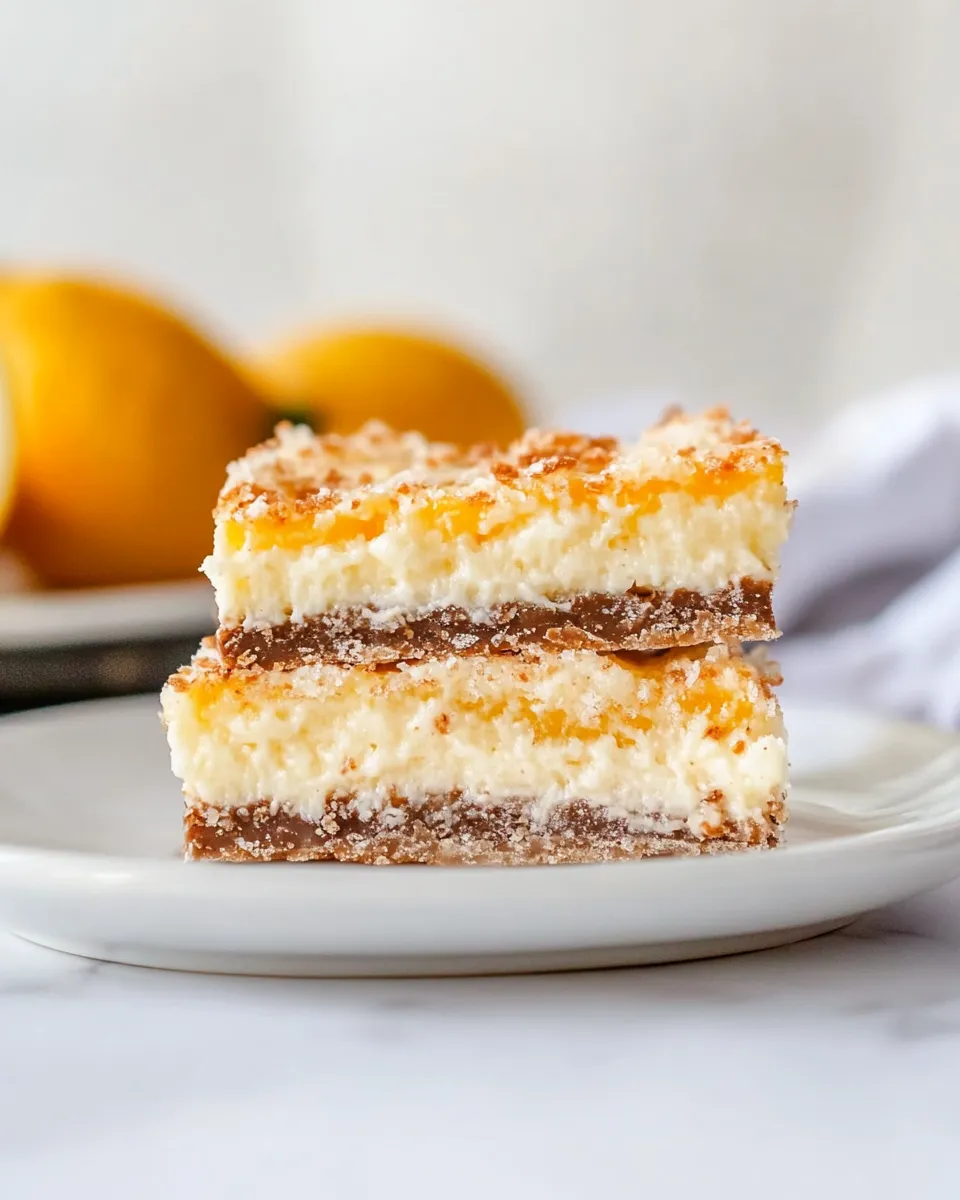
Lemon bars are a classic dessert that brings sunshine to any table, but what if we added a twist that would make them even more irresistible? Enter the Lemon Bars with Kit Kat Crust! This delightful dessert combines the tanginess of lemon with the iconic crunch of Kit Kat bars, creating a unique and delicious treat that’s perfect for any occasion. With a creamy lemon filling nestled atop a buttery Kit Kat crust, these bars are sure to impress your family and friends. Let’s dive into the details of this scrumptious recipe!
What Makes This Recipe Special

There’s something magical about the combination of sweet and tart flavors that lemon brings, but pairing it with a crunchy, chocolatey Kit Kat crust elevates the experience to a whole new level. The crisp texture of the Kit Kat complements the creamy lemon filling, providing a delightful contrast that keeps you coming back for more. Plus, this recipe is straightforward and perfect for both novice and experienced bakers alike. The use of simple ingredients ensures that you can whip these up in no time, making them a go-to dessert for gatherings or simply a sweet treat for yourself.
Shopping List
- 5 – 1.5 ounce Kit Kat Candy Bars (or about 14 mini-sized)
- 8 ounces cream cheese, at room temperature
- 2 cups powdered sugar, measure then sift
- 1 large egg
- 2 tablespoons freshly squeezed lemon juice
- 1 teaspoon lemon extract
- 1 teaspoon finely grated lemon zest
- ½ cup all-purpose flour
- ½ cup granulated white sugar
- ¼ teaspoon lemon extract
- 2 tablespoons butter, softened
What You’ll Need (Gear)
- 9×9-inch baking pan – This is the perfect size for your lemon bars.
- Parchment paper – Helps with easy removal of the bars after baking.
- Mixing bowls – For combining your ingredients smoothly.
- Electric mixer – Ideal for achieving a creamy texture in the filling.
- Measuring cups and spoons – Accurate measurements ensure the best results.
- Spatula – For spreading the filling evenly over the crust.
Directions: Lemon Bars with Kit Kat Crust
Step 1: Prepare the Kit Kat Crust
Begin by preheating your oven to 350°F (175°C). Line the bottom and sides of your 9×9-inch baking pan with parchment paper, leaving an overhang on the sides to make it easy to lift out the bars later.
Step 2: Crush the Kit Kats
Unwrap the Kit Kat bars and place them in a food processor. Pulse until they are finely crushed. If you don’t have a food processor, placing them in a ziplock bag and using a rolling pin will work just as well.
Step 3: Mix the Crust Ingredients
In a mixing bowl, combine the crushed Kit Kats with 2 tablespoons of softened butter and ½ cup of granulated white sugar. Mix until well combined and the mixture resembles wet sand.
Step 4: Press the Crust into the Pan
Transfer the crust mixture into the prepared baking pan and firmly press it into an even layer across the bottom. Bake in the preheated oven for about 10 minutes, until just set and lightly golden. Remove from the oven and let it cool slightly while you prepare the lemon filling.
Step 5: Make the Lemon Filling
In a large mixing bowl, beat the cream cheese until smooth using an electric mixer. Gradually add in the sifted powdered sugar, mixing until well combined and creamy.
Step 6: Add Lemon Flavor
Add the large egg, freshly squeezed lemon juice, lemon extract, and finely grated lemon zest to the cream cheese mixture. Mix until everything is well incorporated.
Step 7: Add Flour
Finally, gently fold in the ½ cup of all-purpose flour until just combined. Be careful not to overmix.
Step 8: Bake the Lemon Bars
Pour the lemon filling over the cooled Kit Kat crust, spreading it evenly with a spatula. Bake in the oven for 20-25 minutes, or until the filling is set and the edges are slightly golden.
Step 9: Cool and Serve
Once baked, remove the pan from the oven and let the lemon bars cool completely in the pan. After cooling, lift the bars out using the parchment overhang. Cut into squares and serve chilled or at room temperature.
Fresh Seasonal Changes

- Spring: Add fresh berries on top for a pop of color and flavor.
- Summer: Substitute lime juice for lemon for a refreshing twist.
- Fall: Incorporate a hint of cinnamon into the filling for a warm spice flavor.
- Winter: Top with a dusting of powdered sugar for a festive look.
What I Learned Testing
- The balance between the sweetness of the Kit Kat and the tartness of the lemon is crucial for a delightful flavor.
- Allowing the bars to cool completely before cutting helps achieve clean, neat slices.
- Experimenting with different citrus fruits can yield interesting and delicious variations.
- Using room temperature cream cheese is vital for a smooth filling texture.
Storage Pro Tips
Store any leftover Lemon Bars with Kit Kat Crust in an airtight container in the refrigerator for up to a week. They can also be frozen for longer storage. Just wrap each bar individually in plastic wrap and place them in a freezer-safe container. When you’re ready to enjoy them, simply let them thaw in the fridge overnight.
Troubleshooting Q&A
What if my lemon bars are too runny?
If your lemon bars are runny, it may be because they weren’t baked long enough. Make sure to bake them until the filling is set and slightly jiggles in the center.
Why did my crust crumble when cutting?
The crust may crumble if it wasn’t pressed firmly enough into the pan. Make sure to pack it down well before baking.
Can I use a different type of candy for the crust?
Absolutely! Feel free to experiment with other chocolate bars or cookies, such as Oreo cookies or Reese’s Peanut Butter Cups, for a different flavor profile.
How do I know when the lemon bars are done baking?
The lemon bars are done when the edges are lightly golden and the center is set, with only a slight jiggle. They will firm up as they cool.
In Closing
Whether you’re hosting a gathering, celebrating a special occasion, or simply need a sweet pick-me-up, these Lemon Bars with Kit Kat Crust are the perfect solution. The combination of the tart lemon filling and the crunchy, chocolatey crust creates a delightful treat that is sure to be a hit. So, gather your ingredients, get into your kitchen, and whip up this delicious dessert that will leave everyone asking for seconds! Enjoy every bite of your Lemon Bars with Kit Kat Crust!
Lemon Bars with Kit Kat Crust
Ingredients
For the Crust:
- 5 1.5 ounce Kit Kat Candy Bars (or about 14 mini-sized)
- 2 tablespoons butter (softened)
- ½ cup granulated white sugar
For the Lemon Filling:
- 8 ounces cream cheese (at room temperature)
- 2 cups powdered sugar (measure then sift)
- 1 large egg
- 2 tablespoons freshly squeezed lemon juice
- 1 teaspoon lemon extract
- 1 teaspoon finely grated lemon zest
- ½ cup all-purpose flour
Instructions
Directions:
- Preheat your oven to 350°F (175°C). Line the bottom and sides of your 9x9-inch baking pan with parchment paper, leaving an overhang on the sides.
- Unwrap the Kit Kat bars and place them in a food processor. Pulse until finely crushed.
- In a mixing bowl, combine the crushed Kit Kats with 2 tablespoons of softened butter and ½ cup of granulated white sugar. Mix until well combined.
- Transfer the crust mixture into the prepared baking pan and firmly press it into an even layer across the bottom. Bake for about 10 minutes, until just set and lightly golden.
- In a large mixing bowl, beat the cream cheese until smooth using an electric mixer. Gradually add in the sifted powdered sugar, mixing until creamy.
- Add the large egg, freshly squeezed lemon juice, lemon extract, and finely grated lemon zest to the cream cheese mixture. Mix until well incorporated.
- Gently fold in the ½ cup of all-purpose flour until just combined.
- Pour the lemon filling over the cooled Kit Kat crust, spreading it evenly. Bake for 20-25 minutes, or until the filling is set and the edges are slightly golden.
- Once baked, cool completely in the pan. Lift out using the parchment overhang, cut into squares, and serve chilled or at room temperature.
Equipment
- 9x9-inch Baking Pan
- Parchment Paper
- Mixing Bowls
- Electric Mixer
- Measuring cups and spoons
- Spatula
Notes
- Store leftovers in an airtight container in the refrigerator for up to a week.
- Freeze individually wrapped bars for longer storage.
- Experiment with other chocolate bars for different flavors.


