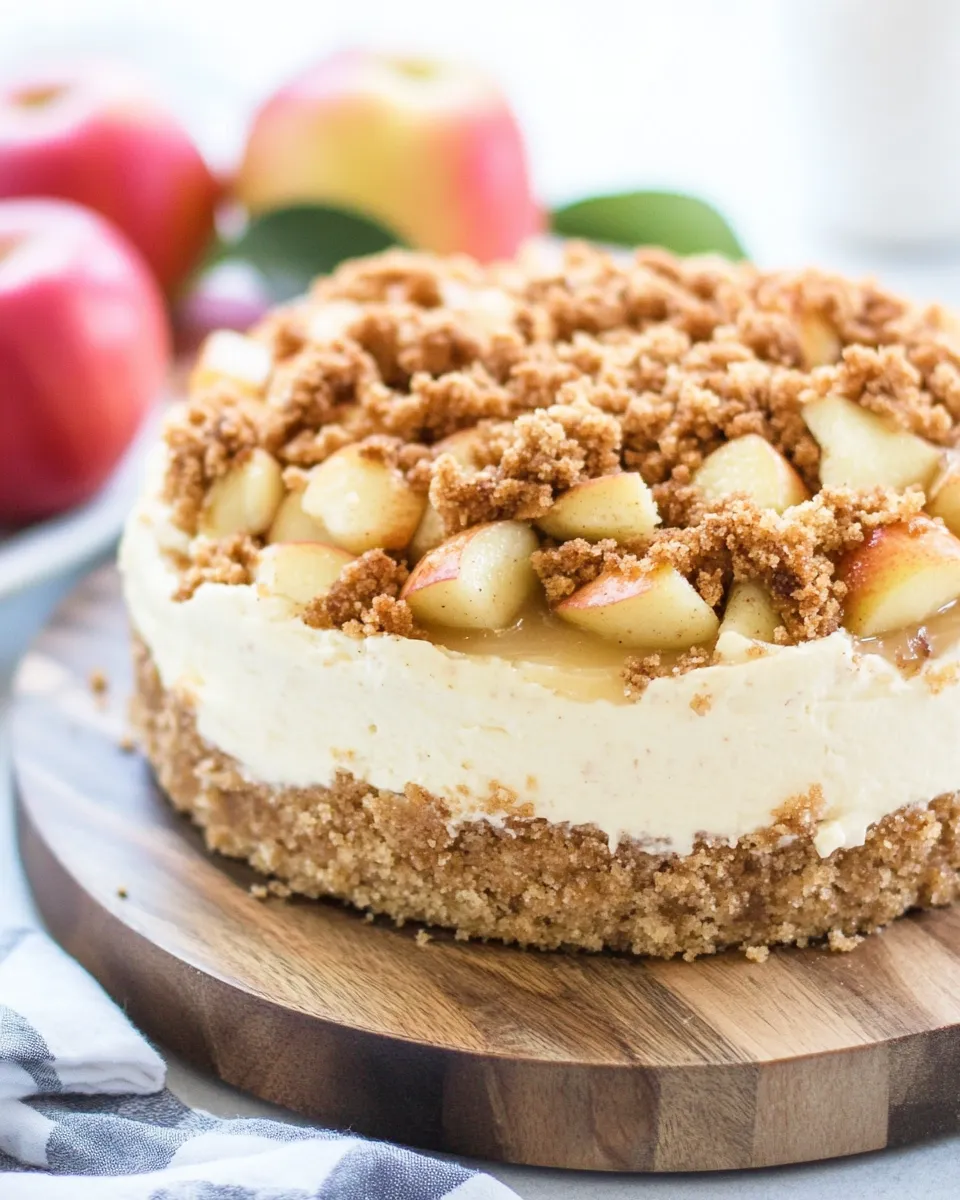
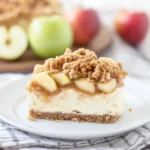
If you’re looking for a dessert that beautifully marries the richness of cheesecake with the comforting flavors of a classic apple crisp, your search ends here. This Apple Crisp Cheesecake is the ultimate dessert that not only highlights seasonal apples but also offers a delightful crunch and creaminess, making it perfect for any occasion. Whether it’s a holiday gathering or just a cozy weekend treat at home, this cheesecake will impress your friends and family alike.
Why This Recipe Is a Must-Try
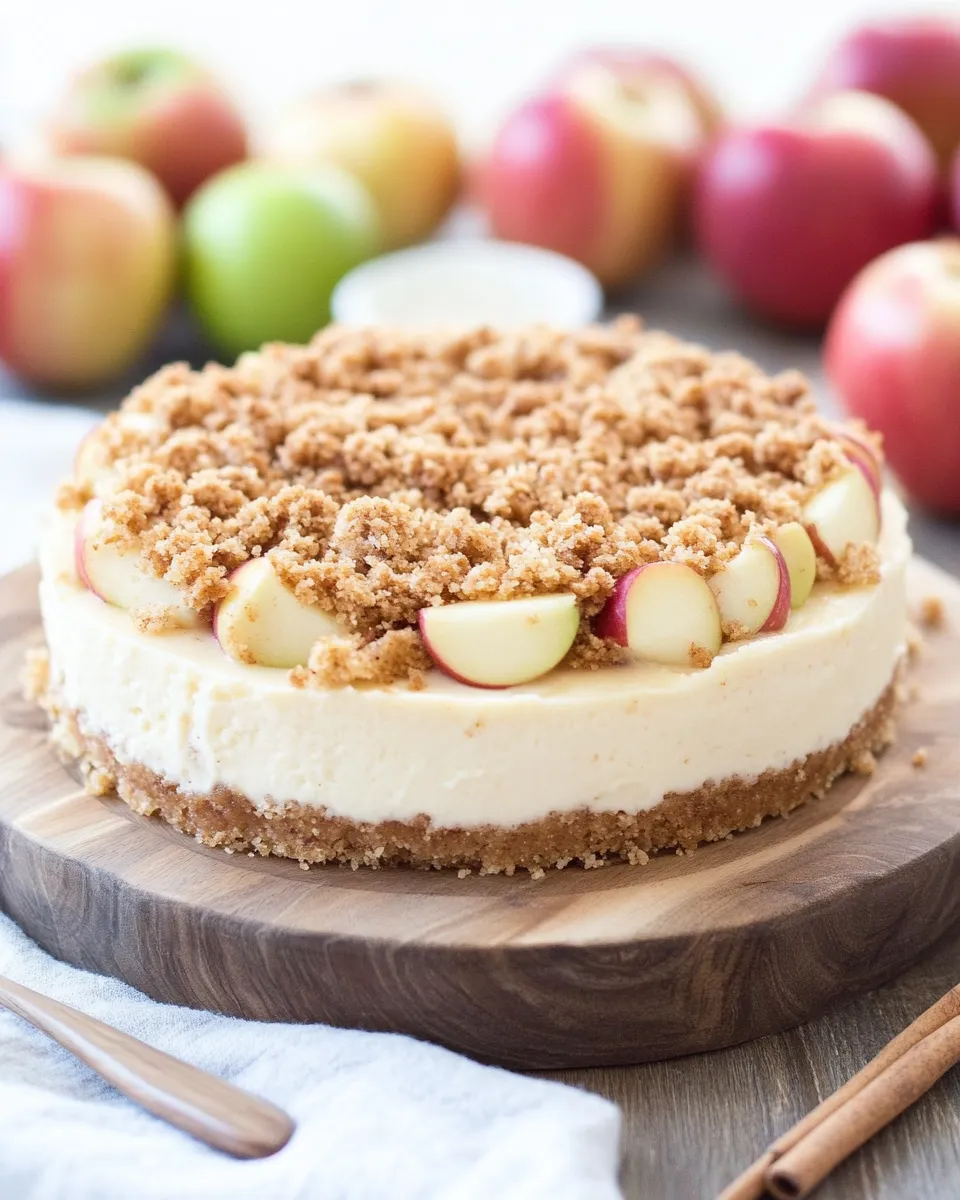
This Apple Crisp Cheesecake is a splendid combination of two beloved desserts. The creamy cheesecake layer is smooth and decadent, while the apple filling brings in the warmth and sweetness of baked apples, enhanced by cinnamon and nutmeg. Topping it all off is a crunchy and buttery oat topping that adds texture and flavor. This dessert is not only visually appealing but also showcases a balance of flavors that are simply irresistible. Perfectly served with a dollop of whipped cream or a scoop of vanilla ice cream, every bite transports you to dessert heaven.
Ingredients
- 2 cups old fashioned oats
- 1 cup all-purpose flour
- ⅓ cup brown sugar, packed
- ¾ cup butter, melted
- ¼ teaspoon salt
- 24 oz cream cheese, room temperature
- ½ teaspoon vanilla extract
- ⅔ cup granulated sugar
- 3 eggs, room temperature
- 3 apples, peeled, cored, and sliced about 1/4″ thick
- 1 teaspoon cinnamon
- ½ teaspoon salt
- 2 tablespoons granulated sugar
- 1 cup brown sugar, packed
- 1 cup all-purpose flour
- 1 cup old fashioned oats
- ½ cup chopped pecans
- ½ teaspoon salt
- ¾ cup unsalted butter, softened
How To Make Apple Crisp Cheesecake
Step 1: Prepare the Crust and Topping
Start by preheating your oven to 350°F (175°C). In a large mixing bowl, combine 2 cups of old fashioned oats, 1 cup of all-purpose flour, ⅓ cup of packed brown sugar, ¼ teaspoon of salt, and melted butter. Mix everything well until combined, and it resembles a crumbly dough. Reserve about a cup of this mixture for the topping, and press the remaining mixture into the bottom of a greased 9-inch springform pan to form the crust. Bake for 10 minutes, then remove from the oven and let cool slightly.
Step 2: Prepare the Apple Filling
In a separate large bowl, combine the sliced apples with 1 teaspoon of cinnamon, ½ teaspoon salt, and 2 tablespoons of granulated sugar. Toss until the apples are well-coated. Set aside to allow the flavors to meld together while we work on the cheesecake batter.
Step 3: Make the Cheesecake Filling
In another bowl, beat the 24 oz of room temperature cream cheese until creamy and smooth. Add in the ½ teaspoon of vanilla extract and ⅔ cup of granulated sugar. Beat until well combined. Then, add in the eggs, one at a time, mixing well after each addition until fully incorporated.
Step 4: Assemble the Cheesecake
Pour the cheesecake filling over the baked crust in the springform pan, spreading it evenly. Next, arrange the spiced apple slices over the cheesecake layer, distributing them evenly. Finally, sprinkle the reserved oat mixture over the top of the apples to create the crispy topping.
Step 5: Bake
Bake the assembled cheesecake in the preheated oven for 45-50 minutes, or until the cheesecake is set around the edges and slightly jiggly in the center. The topping should also be golden brown.
Step 6: Cool and Chill
Once baked, turn off the oven but leave the cheesecake inside with the door slightly ajar for about an hour. This helps prevent cracking. After an hour, remove it from the oven and let it cool completely at room temperature. Once cooled, refrigerate for at least 4 hours, or preferably overnight, to let the flavors meld and the cheesecake firm up.
Expert Tips
- Ensure your cream cheese is at room temperature for easy mixing and a smoother cheesecake.
- For a more pronounced apple flavor, consider using a mix of tart and sweet apples.
- If you prefer a nuttier topping, feel free to add more chopped pecans or your favorite nuts.
- Don’t overbake your cheesecake; it should be set but not overcooked for the best texture.
Variations and Customizations

- Try adding caramel sauce drizzled on top for a sweet and rich addition.
- Incorporate dried cranberries or raisins for extra flavor and texture.
- Swap out the apples for pears or peaches depending on what’s in season.
- Add a hint of maple syrup to the cheesecake mix for a delightful twist.
How to Store Leftovers
After enjoying your Apple Crisp Cheesecake, store any leftovers in the refrigerator. Cover the cheesecake well with plastic wrap or aluminum foil, or transfer it to an airtight container. It will last for up to 5 days. For longer storage, you can freeze individual slices wrapped tightly in plastic wrap and placed in an airtight container or freezer bag. Thaw in the refrigerator before serving for the best taste and texture.
FAQ
Can I make this cheesecake ahead of time?
Absolutely! This cheesecake is perfect for making ahead of time. In fact, letting it chill overnight improves the flavor and texture.
What type of apples should I use?
Using a combination of tart and sweet apples like Granny Smith and Honeycrisp works wonderfully in this recipe to achieve a balanced flavor.
Is there a gluten-free version of this cheesecake?
Yes! You can substitute the all-purpose flour with gluten-free flour and ensure that your oats are certified gluten-free.
Can I use a different nut instead of pecans?
Certainly! Feel free to use walnuts, almonds, or even omit the nuts entirely if you prefer a nut-free version.
Conclusion
This Apple Crisp Cheesecake combines two beloved desserts into one irresistible treat that’s perfect for any occasion. With its creamy texture, spiced apple filling, and crunchy topping, it’s sure to become a new favorite in your dessert repertoire. Whip up this show-stopping cheesecake today, and enjoy the flawless marriage of flavors that will leave you wanting more! Don’t forget to share with your loved ones, because this delightful dessert is meant to be shared and enjoyed together. Happy baking!
Apple Crisp Cheesecake
Ingredients
Crust and Topping
- 2 cups old fashioned oats
- 1 cup all-purpose flour
- ⅓ cup brown sugar, packed
- ¾ cup butter, melted
- ¼ teaspoon salt
Cheesecake Filling
- 24 oz cream cheese, room temperature
- ½ teaspoon vanilla extract
- ⅔ cup granulated sugar
- 3 large eggs, room temperature
Apple Filling
- 3 apples, peeled, cored, and sliced about 1/4" thick
- 1 teaspoon cinnamon
- ½ teaspoon salt
- 2 tablespoons granulated sugar
Topping
- 1 cup brown sugar, packed
- 1 cup all-purpose flour
- 1 cup old fashioned oats
- ½ cup chopped pecans
- ½ teaspoon salt
- ¾ cup unsalted butter, softened
Instructions
- Step 1: Preheat your oven to 350°F (175°C). In a large mixing bowl, combine oats, flour, brown sugar, salt, and melted butter. Mix until combined and crumbly. Reserve 1 cup for topping, press the rest into a greased 9-inch springform pan. Bake for 10 minutes and let cool slightly.
- Step 2: In another bowl, combine sliced apples with cinnamon, salt, and granulated sugar. Toss until well-coated and set aside.
- Step 3: Beat cream cheese until smooth, add vanilla and granulated sugar, mix well. Add eggs one at a time, mixing after each addition.
- Step 4: Pour cheesecake filling over the crust, spread evenly. Arrange apple slices on top, then sprinkle reserved oat mixture over apples.
- Step 5: Bake for 45-50 minutes until set around edges and slightly jiggly in center. Topping should be golden brown.
- Step 6: Turn off oven, leave cheesecake inside with door ajar for 1 hour. Cool completely at room temperature, then refrigerate for at least 4 hours or overnight.
Equipment
- Mixing Bowl
- Springform Pan
- Oven